
Spot Method for Landing
There are no electronic aids, ILS or VASI, for glide slope or glide path alignment at mountain strips. Yet, experienced mountain pilots learn to use a stabilized landing approach that incorporates a pre-determined glide slope. This is called the "spot-method landing technique."
Before explaining this technique, several terms must be defined.
APPROACH ANGLE
The standard 3-degree glide slope is not the most favorable approach angle for light aircraft approaching a mountain airstrip. A steeper 4.5-degree approach angle allows you to see the runway better and makes it easier to effect and see the result of flight path corrections.
GLIDE SLOPE DETERMINATION
For a 3-degree glide slope, multiply the groundspeed in knots by five. With an 80-knot approach groundspeed, the rate of descent of 400 fpm results in a 3-degree approach angle.
To fly a 4-5-degree glide path, multiply the groundspeed in knots by eight. With a 70-knot approach groundspeed, 560 fpm descent yields the 4.5-degree approach angle.
AIMING POINT
The aiming point is the point where the airplane would impact the runway if you don't initiate a flare.
WINDSCREEN MARK
The windscreen mark is the point on the windshield, established by the pilot, used to aim or align the airplane with the aiming point.
From cruise flight at a constant altitude with cruise power and cruise airspeed, determine where the horizon intersects the windscreen. Use a grease pencil (China marker) and make a mark one-half inch below the horizon line on the windscreen in front of your field of view.
It may be better to draw a plus sign instead of a dot. Make it a 2-inch horizontal line (one-half inch below the horizon) and a 2-inch vertical line directly in front of your field of view.
When you lean forward to make the horizontal mark, your parallax will change and the mark will be made too high. Note the position where the mark is to be made before leaning forward.
Test the mark. From a normal glide, look at the point on the ground that is aligned with your windscreen mark. It will remain aligned with the windscreen mark throughout the descent in a no-wind condition. If not, it may be necessary to adjust the horizontal mark up or down. Try moving it in one-half inch increments.
The windscreen mark, once properly determined, will remain aligned with a ground point regardless of flap selection.
TOUCHDOWN POINT
The touchdown point is 200-300 feet beyond the aiming point when approaching the runway at the proper approach speed.
GO-AROUND POINT
The go-around point is that point on the runway where, if the airplane is not on the ground, sufficient runway does not remain to complete the landing and stop in the distance remaining.
The pilot should always establish a go-around point. If the airplane requires 1,000 feet to land and the runway length is 2,000 feet, the go-around point is at the half-way point of the runway. If the runway is 3,000 feet in length, the go-around point is the last one-third of the runway.
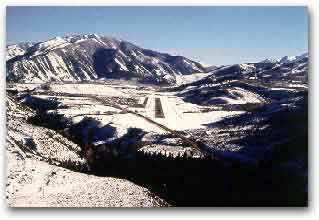
Final approach to runway 15 at Aspen, CO (ASE)
PERFORMANCE
A constant power and a constant attitude result in a constant performance. If attitude and power remain the same, the rate of descent will remain the constant.
Changing the power to align the windscreen mark and aiming point requires a change in pitch attitude to maintain a constant airspeed.
SPOT-METHOD TECHNIQUE
On downwind, opposite the landing point, do the pre-landing cockpit check. Adjust the airspeed to the optimum approach speed and adjust the power to obtain the desired rate of descent for the best approach angle.
On final approach, place the windscreen mark on the aiming point by making power adjustments. It is important to maintain a constant indicated approach speed.
If the aiming point is below the windscreen mark the airplane is too high. Reduce power to align the windscreen mark and the aiming point. When the power is reduced, the nose of the airplane must be lowered to maintain a constant airspeed. If the airplane was trimmed to maintain a constant airspeed, when the power is reduced, the nose will lower by itself and will sustain the constant airspeed.
If the aiming point is above the windscreen mark, the airplane is too low. Add power to align the windscreen mark and aiming point.
When power is added, the nose will raise to maintain a constant airspeed, and the rate of descent will decrease.
PITCH CHANGES
Because of the inherent stability of the airplane, the addition or reduction of power will result in the nose rising or lowering by itself, providing the airplane has been trimmed to maintain a constant airspeed and constant rate of descent.
SPOT LANDING USES
The spot-method landing technique results in accurate landings. Practice this technique until it becomes automatic for all landing approaches, not just at mountain strips.
Once you have mastered the spot method, you will find it useful for other aspects of flight, such as:
- Cloud avoidance - the VFR pilot trapped on top of an
overcast who finds a hole can descend through the hole without
entering the cloud.
- Descent to pattern altitude - to enter the pattern at the
proper altitude and proper spot.
- Crossing ridges - to determine the airplane is higher than
the ridge - look at the ridge in comparison to the windscreen
mark. If the ridge is below the mark, the airplane is above the
ridge (must be determined from level flight).
- Forced landings - to mentally subscribe an arc on the ground
to define the landing area begin where the windscreen mark
points at the ground. Use this ground spot as the aiming point.
|
|
|